Let your visitors join the waitlist simply by scanning a QR code with their phone—no contact, no hardware needed.
Compared to the iPad sign-in, the QR check-in is:
-
Fully contactless
-
Faster to set up
-
Perfect for self-service environments


Getting Started with QR Code Sign-In
-
Create your Visitor website

This is the page visitors will land on after scanning the QR code.
It shows your opening hours, contact info, and allows them to join the waitlist.
Not set up yet? Follow our Visitor website setup guide to get started—it only takes a minute.
-
Set Opening Hours
Visitors can only join the waitlist during your defined business hours.
Update them under Location Settings → Opening Hours.
-
Enable Remote Sign-In
Go to the Visitor website settings and switch on Remote Sign-In.
This allows visitors to join the waitlist directly from their phone.
-
Print and Display the QR Code
Click Print Poster to download the ready-to-go PDF.

Place it somewhere easy to spot—on the entrance door, walls, or check-in area.
Once scanned, visitors can join the line instantly—right from their own device.
What Happens After Sign-In?
-
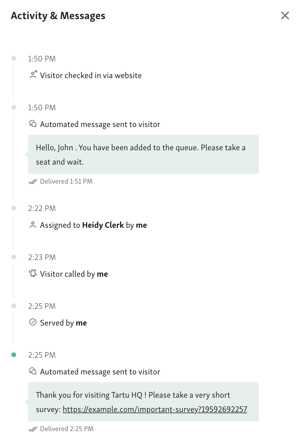
Your clerks will see the signed-in visitors in the Service View's waitlist. An automatic label named "from website" is added to distinguish the visitor from other types of sign-ups.

Visit status page
As soon as a visitor completes the form, they’re taken to the Visit status page.
This page helps them:
-
Review their submitted info (like name, service, phone number, email)
-
Track the status of their visit in real time
Visitors can keep the page open in their browser while they wait.

Visit statuses Explained
The Visit status page displays one of four clear updates:
-
You are in the waitlist – Visitor has successfully signed in.
-
It’s your turn – It’s time for service! Depending on your settings, this status can include:
-
Desk number
-
Clerk name
-
Other instructions
-
-
Thank you for visiting – The service has been completed.
-
Your visit is cancelled – The visitor was marked as a no-show or removed from the waitlist.


OPTIONAL: SMS text message notifications
You can send automatic text updates by asking for a phone number during sign-in.
Here’s how it works:
-
After sign-in, visitors get a confirmation SMS.
-
When it’s their turn, they receive a second message with service details.
-
Visitors and clerks can also exchange messages if needed—ideal for remote or flexible setups.