In Qminder, waiting lines/ service lines are defined as Services. The best way to differentiate your waiting lines is to configure Services. This allows you to triage your visitors, direct visitors to the right desk, and differentiate your data better.
The service overview and settings can be found under the Locations tab. Click on the location's name, which settings you wish to change, and then select Services.

ADDING SERVICES
To add a new Service, click the + New Service option from the top right corner or the bottom of the page.

Once you have created services, keep in mind:
-
You can always edit and update the services in real-time
-
The same services can be shown as options on the sign-in iPad
-
You can dedicate the TV to show only one specific service line
Name your service, assign a color, and click Save to create the new service.

In the same view you can manage:
- Translations for the services, if you have Languages & Translations set-up for the location.
📖 Learn more: How to create a multilingual flow? Add Languages & Translations to your location. - Availability of the service for appointment scheduling and/or walk-ins.
📖 Learn more: How to enable Appointments for your location - Archiving the service.
💡 Note: Check-in types for walk-ins and appointments are managed in Service settings. To make a service accessible via Remote Sign-In, it must first be enabled for walk-ins.
👉 Learn more in Create your own Visitor Website under Enable Remote Sign-In (Optional).
Service colors appear the same across the Calendar view, Data Insights and Service pages. This makes identifying visitors based on their service line faster and easier.
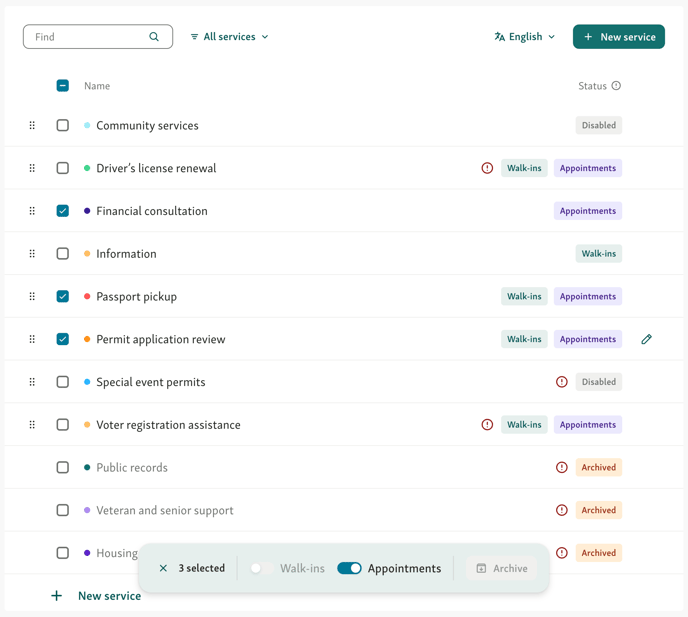
Services overview
The Services overview table shows:
-
Name: Each row is clickable and opens the settings card for that service.
-
Status: Each service can have one of four statuses:

-
Walk-ins: Accepts walk-in registrations; shown by default on iPad, Service View, and Remote Sign-In.
-
Appointments: Accepts appointments; bookable via Visitor Website; clerks can book for any service.
-
Disabled: Both registration types disabled; hidden everywhere; no new sign-ins allowed.
-
Archived: Closed for new sign-ins but kept for reporting and analysis. Can be unarchived anytime without data loss.
-
-
Translation status: If Multilingual is enabled, the status of translations will be shown for each service. See Add Languages & Translations for more info.

The Services overview page also includes:
-
Search: Quickly find services by name.
-
Filters: Filter services by status (walk-ins, appointments, disabled, archived).
-
Note: For services with different statuses, bulk actions only allow archiving. To adjust check-in types, select services with the same status (e.g. all “Appointments”).

-
- Bulk actions: Select multiple services to make changes at once.

💡 Tip: Combine filters with bulk actions to manage services even faster.
One card, everywhere
Whether you access Services from the Services tab under Location settings, or from the Appointments settings, you’ll always be taken to the same service card.
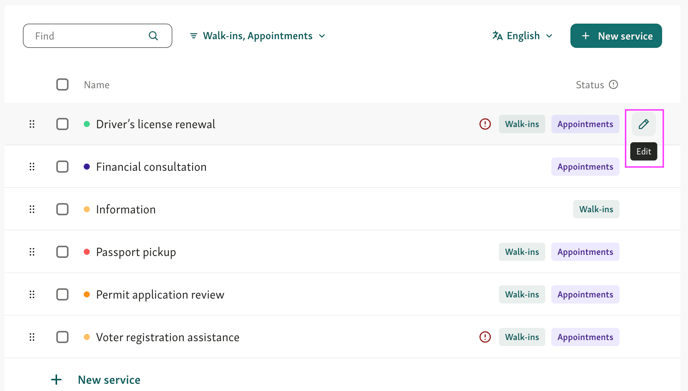
EDITING SERVICES
To edit an existing Service’s name or color, click on the service you wish to edit. You can also hover over services and click the Edit icon from the right-hand corner.
You can also drag and drop service names to re-arrange the order based on priority or other factors. The services appear in the same order on the Service page, Line selection view.
DISABLING/ENABLING SERVICES
⭐ Services can be disabled and enabled for temporary cases where Managers or Admins need to close specific services for a short time, such as when the service capacity is full or the service is on hold for other reasons.
Disables service: is the service that is created, but does not have any check-in types enabled.
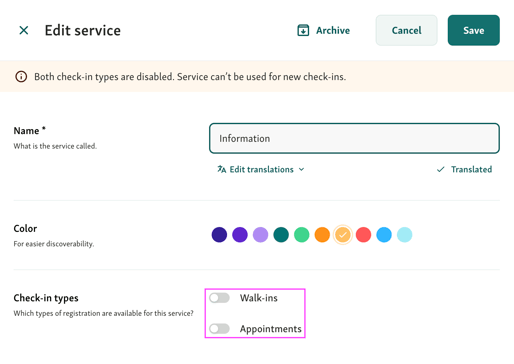
A disabled Service will not be shown on the iPad service selection nor in the Service View page.
NB!: A location requires at least 1 active Service at any given time.
ARCHIVING/UNARCHIVING SERVICES
⭐ Archiving a service (line) is useful for long-term or permanent cases where Managers or Admins need to close specific services for a longer time, such as when a service is not available anymore.
To Archive a service, choose a service from the list by clicking on the check mark box and choose Archive from the bottom menu. You can also hover over the service name and click on the Archive icon from the right-hand corner.

NB!: You can only Archive a service when no visitor is waiting or being served within it.
To see the Archived services, change the filter from the top bar and choose Archived from the list.

To Unarchive a service, first apply the Archived filter from above, and after that, choose the archived service from the list by clicking on the check mark box. Choose Unarchive from the bottom menu.
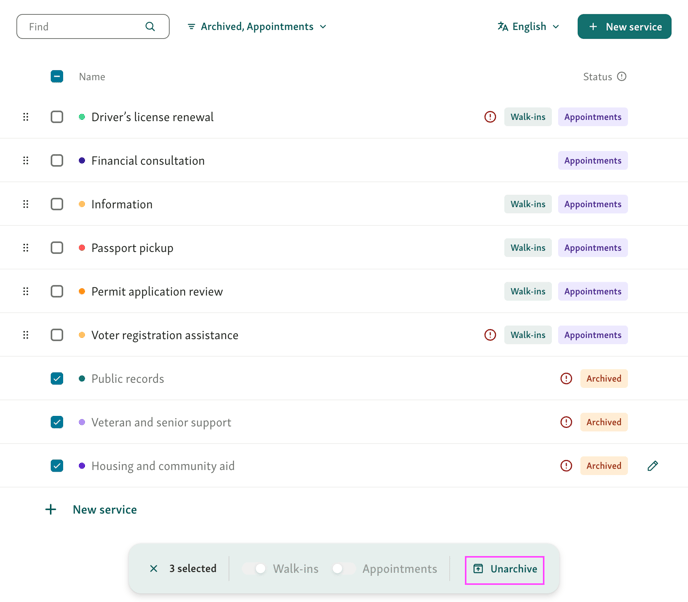
You can also open the archived service card and click on the Unarchive icon from the top right-hand corner.
NB! Archiving a line will still reflect that line's visitor data in the Team Performance tab and Team Member Details page.
This is to ensure that users' performance data is not affected by archiving a line. If you need to exclude certain visit data from either the Team Performance or Team Member Details page, then you can do so by adjusting the time frame respectively.
APPLYING BULK CHANGES
⭐ You can change the Status of multiple services (lines) at once or Archive them together.

To do this, choose services from the list by clicking on the check mark boxes and choose the action you want to complete from the bottom menu.