Qminder’s Appointments feature supports automated SMS notifications to keep your visitors informed every step of the way.
These messages are sent automatically based on appointment status or visitor activity. No need to message people manually - unless you want to, of course (two-way messaging is still available for real-time follow-ups).
🗓 When Appointments messages are sent
Before service

These are triggered based on appointment scheduling events:
- Appointment is confirmed
Triggered when a visitor books a new appointment.
Example message:
Hi John, your appointment at Main Library is confirmed for July 17 from 2:00 PM to 2:30 PM.

- Appointment is rescheduled
Sent when a visitor reschedules their appointment.
Example message:
Hi John, your appointment at Main Library has been rescheduled for July 18 from 3:00 PM to 3:30 PM.

- Appointment reminder
Sent automatically ahead of time (lead time customizable).
Available options:- 3 days before
- 2 days before
- 1 day before
- 2/1 hours before
Example message:
Reminder: Your appointment at Main Library is tomorrow at 2:00 PM.

- Appointment is cancelled
Triggered when a visitor cancels their appointment.
Example message:
Hi John, your appointment at Main Library has been cancelled.

During service

These notifications relate to real-time service flow:
- Visitor is added to waiting list
Triggered when an appointment-holder checks in.
Example message:
Hi John, welcome! You're now in line. - Visitor is being called
Triggered when a staff member calls the visitor.
Example message:
It's your turn, John! Please proceed to the front. - Visitor is being called to a desk
Optional: Includes desk number or location.
Example message:
John, please go to Desk 2.
After service

Sent once the appointment has been successfully completed.
- After successful service
Example message:
Thank you for your visit, John!
Customize the content of the message
You can change the content of the message in the text field box.
Make sure to save your changes by pressing the Save & Go live button!
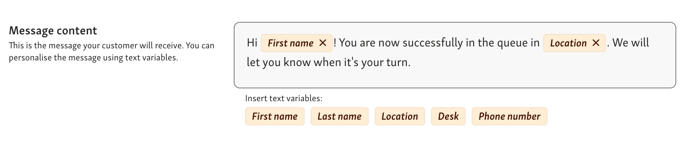
The words highlighted in yellow are pre-defined placeholders which change value accordingly to actual information. To add a placeholder, click on the yellow buttons below the text box. To delete the placeholder, simply click the on the X next to the placeholder.
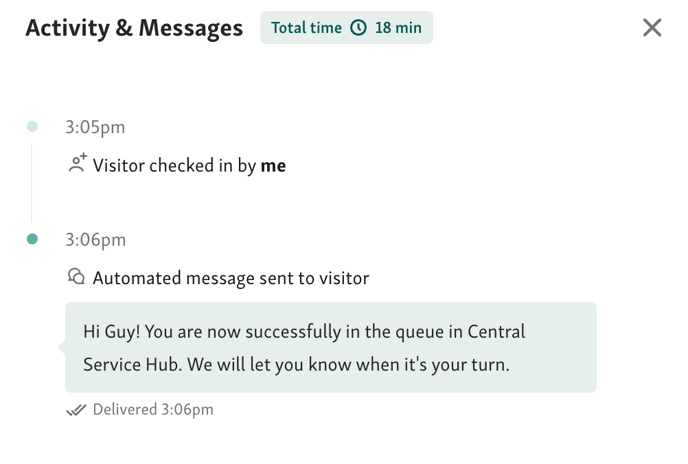
You can see all messages that have been sent out in the Activity log in a visitor's details.
Pre-defined placeholders for Appointments confirmations and reminders
When setting up automated text messages for Appointment confirmations or reminders, you can personalize them using dynamic placeholders, also called text variables.

These placeholders automatically pull information from the visitor’s booking and insert it into the message. This helps your SMS feel personal, relevant, and informative - without extra manual work.
Here’s what you can include:
-
First name
Inserts the visitor’s first name.
Example: Hi *Sarah*, your appointment is confirmed.
-
Last name
Adds the visitor’s last name if needed.
Example: Reservation for *Sarah Connor* confirmed.
-
Location
Refers to the name of your Qminder location.
Example: at *Downtown City Hall*
-
Desk
Shows the assigned desk (if known at the time of booking).
Useful if visitors need to go directly to a specific counter.
-
Phone number
Displays the phone number the visitor entered.
This is rarely used in outbound messages but can be helpful internally.
-
Appointment date
Shows the date of the appointment (e.g. July 22).
Example: Your appointment is on *July 22*
-
Appointment start time
Inserts the start time of the appointment.
Example: Your appointment starts at *2:30 PM*
-
Appointment end time
Adds the end time of the appointment, if defined.
Example: ...from 2:30 PM *to 3:00 PM*
-
Appointment visit URL
A unique link to the visitor’s confirmation page on the Visitor Website, which they can return to at any time.
It includes their details, time, location, and an option to reschedule or cancel (if enabled).
Example usage: See your details here: [link]
👉 Learn more about confirmation pages here.
🧩 Message rules: All services vs. individual
When creating an automated message, you’ll choose whether it applies to:
-
All services
-
Only specific services

Each service can have one message per type, and any service-specific rule overrides the generic “All services” version.
This is helpful when you want to:
-
Use the same base message for most services
-
Add personalized copy for high-touch or unique services
🧠 Smart validation helps you stay on track
Qminder is designed with ease of use and clarity in mind.
If your message setup doesn’t follow the rule logic, the system will:
-
Show a clear error message
(e.g. when an “All services” rule already exists)
-
Prevent saving invalid rules
-
Disable selection for services that already have an active message of that type
💡 This helps you avoid duplicates or conflicts — and ensures your visitors only receive the message that’s intended for them.
📸 Example:

In this case, a general message is already live. You’ll need to remove it or switch to a service-specific setup.
📸 Disabled service selector:

Services with an active message will be greyed out, making it easy to see what’s available at a glance.
⚙️ How to customize messages
- Go to Location Settings → Text messages
- Select a trigger (e.g. “Appointment reminder”)
- Write your message using text variables:
- First name, Last name, Location, Appointment date, etc.
- (Optional) Add translations for each supported language
- Click Save & Go live

You can also send messages to specific services only, or all services.


🔄 Translation support
If you offer multilingual services, add translations for each message manually, or use the Auto translate button.

Visitors will get the message in the language they selected at check-in.
⚠️ If a translation is missing, the message will be sent in the default language - English.
To ensure your visitors get clear, accurate info in their preferred language, make sure to add translations for every supported language.
Learn more about Languages & Translations: What is it and how does it function?
✉️ Email support?
Not yet. At this time, only SMS notifications are supported for Appointments.
We’ll update this article when email support becomes available.
🧭 Related articles
- Enable text messaging in Qminder
- Set up automated text messages
- Post-service text messages
- How to set up appointments